Ir al contenido


Contenido con la más alta reputación


#98358 [MULTILENGUAJE] WM_MOUSELEAVE / WM_MOUSEENTER

Escrito por escafandra el 02 febrero 2017 - 02:54

El título lleva a engaño puesto que el mensaje WM_MOUSEENTER no existe aunque para casi todos, el concepto si.
 
Se trata de manejar los eventos OnMouseEnter y OnMouseLeave de una ventana en versiones Delphi antiguas que no implementan esta característica, al igual que en versiones Builder de la misma época. También servirá para usarlo con cualquier ventana sin necesidad de que se trate de un control - componente específico.
 
El mensaje WM_MOUSELEAVE es recibido por una ventana si preparó previamente su solicitud con una llamada a TrackMouseEvent. Simplemente informa que el cursor del ratón abandonó el área cliente de dicha ventana. Para detectar la presencia del cursor en la ventana (WM_MOUSEENTER) basta con gestionar WM_MOUSEMOVE.
 
Propongo una clase que habilita el tratamiento del mensaje WM_MOUSELEAVE recibido por cualquier ventana (incluidos componentes derivados de TControl) Para conseguirlo realiza un Hook a la función de tratamiento de mensajes realizando un subclassing que genere dos eventos: OnMouseLeave y OnMouseEnter.
 
Este sería el código de la Unit:


delphi
  1. unit MouseLeave;
  2.  
  3. //--------------------------------------------------------------------------------------------------
  4. // TMouseLeave (Versión Hook estilo C++)
  5. // escafandra 2017
  6. // Clase para manejo de WM_MOUSELEAVE de una ventana
  7.  
  8. interface
  9.  
  10. uses Windows, Messages;
  11.  
  12. type
  13. TOnMouseLeave = procedure(Handle: HWND) of object;
  14. TOnMouseEnter = procedure(Handle: HWND) of object;
  15.  
  16. type
  17. TMouseLeave = class
  18. private
  19. Handle: HWND;
  20. OldWndProc: Pointer;
  21. function WndProc(Handle: HWND; Msg: DWORD; WParam: Longint; LParam: Longint): Longint; stdcall;
  22. public
  23. OnMouseLeave: TOnMouseLeave;
  24. OnMouseEnter: TOnMouseEnter;
  25. constructor Create; overload;
  26. constructor Create(WND: HWND); overload;
  27. destructor Destroy; override;
  28. procedure SetHandle(WND: HWND);
  29. end;
  30.  
  31. implementation
  32.  
  33.  
  34. function DefWndProc(Handle: HWND; Msg: DWORD; WParam: Longint; LParam: Longint): Longint; stdcall;
  35. var
  36. pMouseLeave: TMouseLeave;
  37. begin
  38. pMouseLeave:= TMouseLeave(GetWindowLong(Handle, GWL_USERDATA));
  39. if pMouseLeave <> nil then
  40. Result:= pMouseLeave.WndProc(Handle, Msg, WParam, LParam)
  41. else
  42. Result:= DefWindowProc(Handle, Msg, WParam, LParam);
  43. end;
  44.  
  45. constructor TMouseLeave.Create;
  46. begin
  47. OnMouseLeave:= nil;
  48. OnMouseEnter:= nil;
  49. SetHandle(0);
  50. end;
  51.  
  52. constructor TMouseLeave.Create(WND: HWND);
  53. begin
  54. OnMouseLeave:= nil;
  55. OnMouseEnter:= nil;
  56. SetHandle(WND);
  57. end;
  58.  
  59. function TMouseLeave.WndProc(Handle: HWND; Msg: DWORD; WParam: Longint; LParam: Longint): Longint; stdcall;
  60. var
  61. TE: TTRACKMOUSEEVENT;
  62. begin
  63. if (Msg = WM_MOUSELEAVE) and (@OnMouseLeave <> nil) then
  64. OnMouseLeave(Handle)
  65.  
  66. else if (Msg = WM_MOUSEMOVE) and (@OnMouseEnter <> nil) then
  67. begin
  68. TE.cbSize:= sizeof(TTRACKMOUSEEVENT);
  69. TE.dwFlags:= TME_LEAVE;
  70. TE.hwndTrack:= Handle;
  71. TE.dwHoverTime:= HOVER_DEFAULT;
  72. TrackMouseEvent(TE);
  73. OnMouseEnter(Handle);
  74. end;
  75. Result:= CallWindowProc(OldWndProc, Handle, Msg, WParam, LParam);
  76. end;
  77.  
  78.  
  79. procedure TMouseLeave.SetHandle(WND: HWND);
  80. begin
  81. if (WND <> INVALID_HANDLE_VALUE) and (WND <> Handle) then
  82. begin
  83. if WND = 0 then
  84. begin
  85. SetWindowLong(Handle, GWL_USERDATA, 0);
  86. SetWindowLong(Handle, GWL_WNDPROC, LongInt(OldWndProc));
  87. end;
  88. if WND <> 0 then
  89. begin
  90. SetWindowLong(WND, GWL_USERDATA, LongInt(self));
  91. OldWndProc:= Pointer(SetWindowLong(WND, GWL_WNDPROC, LongInt(@DefWndProc)));
  92. end;
  93. Handle:= WND;
  94. end;
  95. end;
  96.  
  97. destructor TMouseLeave.Destroy;
  98. begin
  99. OnMouseLeave:= nil;
  100. OnMouseEnter:= nil;
  101. SetHandle(0);
  102. end;
  103.  
  104. end.

 
Un ejemplo de uso con un botón, coloco la Unit completa para mostrar todos los pasos de uso y declaración de los eventos:


delphi
  1. unit Unit1;
  2.  
  3. interface
  4.  
  5. uses
  6. Windows, Messages, SysUtils, Variants, Classes, Graphics, Controls, Forms,
  7. Dialogs, StdCtrls, MouseLeave;
  8.  
  9. type
  10. TForm1 = class(TForm)
  11. Button1: TButton;
  12. procedure FormCreate(Sender: TObject);
  13. procedure FormClose(Sender: TObject; var Action: TCloseAction);
  14. private
  15. ME: TMouseLeave;
  16. procedure OnMouseLeave(Wnd: HWND);
  17. procedure OnMouseEnter(Wnd: HWND);
  18. public
  19. { Public declarations }
  20. end;
  21.  
  22. var
  23. Form1: TForm1;
  24.  
  25. implementation
  26.  
  27. {$R *.dfm}
  28.  
  29. procedure TForm1.FormCreate(Sender: TObject);
  30. begin
  31. ME:= TMouseLeave.Create(Button1.Handle);
  32. ME.OnMouseEnter:= OnMouseEnter;
  33. ME.OnMouseLeave:= OnMouseLeave;
  34. end;
  35.  
  36. procedure TForm1.OnMouseLeave(Wnd: HWND);
  37. begin
  38. with FindControl(Wnd) as TButton do Caption:= 'Adios';
  39. end;
  40.  
  41. procedure TForm1.OnMouseEnter(Wnd: HWND);
  42. begin
  43. with FindControl(Wnd) as TButton do Caption:= 'Hola';
  44. end;
  45.  
  46. procedure TForm1.FormClose(Sender: TObject; var Action: TCloseAction);
  47. begin
  48. ME.Free;
  49. end;
  50.  
  51. end.

Se precisa crear tantos objetos TMouseLeave como ventanas a controlar.
 
Subo el código.
 
 
Saludos.

Archivos adjuntos


  • 6


#97602 Hook a la API CreateProcessInternalW en Win10

Escrito por escafandra el 19 diciembre 2016 - 08:20

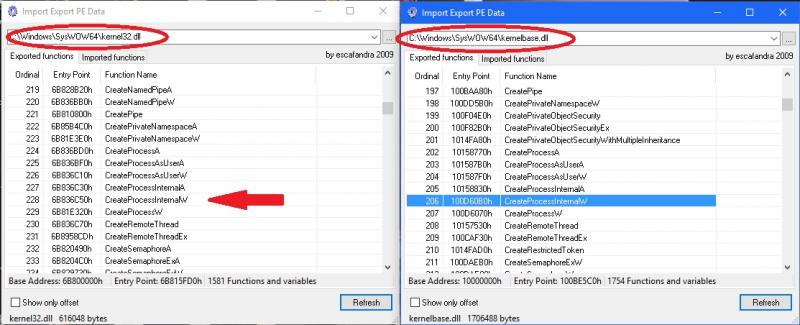
Me plantearon una duda sobre el Hook a la API CreateProcessInternalW en Win10, la duda era porqué no funcionaba en Win10 si habían seguido el ejemplo que en su día publiqué aquí. Así que probé ha realizar un ejemplo y efectivamente no funcionaba. La API CreateProcessInternalW se exporta en Kernell32.dll y comprobé que así seguía siendo en win10.
 
Algo había cambiado en Win10 y como es una API indocumentada M$ no tiene porqué informar nada. Busqué en la red, pero no encontré nada, de esta forma tocaba usar el debugger y comparar direcciones de memoria de las API. El resultado es que Win10 usa la API exportada en KernelBase.dll y no la clásica Kernell32.dll. Una vez conocido este detalle el hook vuelve a funcionar.
 
post-12294-0-82310800-1482200416.jpg
 
 
Voy a poner un ejemplo hecho en delphi Berlin para resarcir la duda y aclarar la definición de esa API en delphi:

delphi
  1. unit Unit1;
  2.  
  3. interface
  4.  
  5. uses
  6.   Winapi.Windows, Winapi.Messages, System.SysUtils, System.Variants, System.Classes, Vcl.Graphics,
  7.   Vcl.Controls, Vcl.Forms, Vcl.Dialogs, Vcl.StdCtrls, APIHook, ShellAPI;
  8.  
  9. type
  10.   TForm1 = class(TForm)
  11.     Button1: TButton;
  12.     procedure Button1Click(Sender: TObject);
  13.   private
  14.     { Private declarations }
  15.   public
  16.     { Public declarations }
  17.   end;
  18.  
  19. // Defino esta estructura para los que quieran probar en delphi 7
  20. PSTARTUPINFOW = ^_STARTUPINFOW;
  21. _STARTUPINFOW = record
  22.     cb: DWORD;
  23.     lpReserved: PWideChar;
  24.     lpDesktop: PWideChar;
  25.     lpTitle: PWideChar;
  26.     dwX: DWORD;
  27.     dwY: DWORD;
  28.     dwXSize: DWORD;
  29.     dwYSize: DWORD;
  30.     dwXCountChars: DWORD;
  31.     dwYCountChars: DWORD;
  32.     dwFillAttribute: DWORD;
  33.     dwFlags: DWORD;
  34.     wShowWindow: Word;
  35.     cbReserved2: Word;
  36.     lpReserved2: PByte;
  37.     hStdInput: THandle;
  38.     hStdOutput: THandle;
  39.     hStdError: THandle;
  40.   end;
  41.  
  42. PCreateProcessInternalW = function(hToken: THANDLE; pApplicationName, lpCommandLine: PWCHAR;
  43.                                    lpProcessAttributes, lpThreadAttributes:    PSECURITYATTRIBUTES; bInheritHandles: BOOL;
  44.                                    dwCreationFlags: DWORD; lpEnvironment: Pointer; lpCurrentDirectory: PWCHAR;
  45.                                    lpStartupInfo: PSTARTUPINFOW; lpProcessInformation: PPROCESSINFORMATION; hNewToken: PHANDLE): BOOL; stdcall;
  46.  
  47.  
  48. var
  49.   OldCreateProcessInternalW: PCreateProcessInternalW = nil;
  50.  
  51.  
  52. var
  53.   Form1: TForm1;
  54.  
  55. implementation
  56.  
  57. {$R *.dfm}
  58. function NewCreateProcessInternalW(hToken: THANDLE; pApplicationName, lpCommandLine: PWCHAR;
  59.                           lpProcessAttributes, lpThreadAttributes:    PSECURITYATTRIBUTES; bInheritHandles: BOOL;
  60.                           dwCreationFlags: DWORD; lpEnvironment: Pointer; lpCurrentDirectory: PWCHAR;
  61.                           lpStartupInfo: PSTARTUPINFOW; lpProcessInformation: PPROCESSINFORMATION; hNewToken: PHANDLE): BOOL; stdcall;
  62. begin
  63.   Result:= FALSE;
  64.   Winapi.Windows.Beep(500, 100);
  65.   exit;
  66. //  Result:= OldCreateProcessInternalW(hToken, pApplicationName, lpCommandLine, lpProcessAttributes, lpThreadAttributes, bInheritHandles,
  67. //                          dwCreationFlags, lpEnvironment, lpCurrentDirectory, lpStartupInfo, lpProcessInformation, hNewToken);
  68. end;
  69. //----------------------------------------------------------------------------
  70. // Instalando los Hooks a las API
  71. procedure InstallHooks;
  72. begin
  73.   InstallHook(@NewCreateProcessInternalW, @OldCreateProcessInternalW, 'Kernelbase.dll', 'CreateProcessInternalW', true);
  74. end;
  75.  
  76. procedure UnInstallHooks;
  77. begin
  78.   UnInstallHook(@OldCreateProcessInternalW, 'KernelBase.dll', 'CreateProcessInternalW');
  79. end;
  80.  
  81. procedure Execute(ProcessName: AnsiString);
  82. var
  83.   si: TStartupInfoA;
  84.   pi: TProcessInformation;
  85.  
  86. begin
  87.   ZeroMemory(@si, SizeOf(TStartupInfoA));
  88.   si.cb := SizeOf(TStartupInfoA);
  89.   si.dwFlags:= STARTF_USESHOWWINDOW;
  90.   si.wShowWindow:= SW_SHOW;
  91.  
  92.   CreateProcessA(nil, PAnsiChar(ProcessName), nil, nil, false, 0, nil, nil, si, pi);
  93. end;
  94.  
  95.  
  96.  
  97. procedure TForm1.Button1Click(Sender: TObject);
  98. begin
  99.   InstallHooks;
  100.   Execute('cmd.exe');
  101.   ShellExecute(0,'open','cmd.exe', nil, nil, SW_SHOW);
  102.   UnInstallHooks;
  103. end;
  104.  
  105. end.
  106.  
  107.  
  108.  
  109. end.

El ejemplo muestra como un hook a la API CreateProcessInternalW es capaz de interceptar distintas formas de ejecutar un proceso.
 
El misterio queda resuelto.
 
 
Saludos.

Archivos adjuntos


  • 5


#96794 [TRUCO DELPHI] Registrar y Desinstalar un ActiveX en Delphi.

Escrito por Rantor777 el 05 noviembre 2016 - 02:22

[TRUCO DELPHI] Registrar y Desinstalar un ActiveX en Delphi.


Declaración de Tipos.


delphi
  1. type
  2. TDllRegisterServer = function: HResult; stdcall;

Función para registrar. [MÉTODO 1]


delphi
  1. function RegisterOCX(FileName: string): Boolean;
  2. var
  3. OCXHand: THandle;
  4. RegFunc: TDllRegisterServer;
  5. begin
  6. OCXHand := LoadLibrary(PChar(FileName));
  7. RegFunc := GetProcAddress(OCXHand, 'DllRegisterServer');
  8. if @RegFunc <> nil then
  9. Result := RegFunc = S_OK
  10. else
  11. Result := False;
  12. FreeLibrary(OCXHand);
  13. end;

Des Instalar o No Registrar.


delphi
  1. function UnRegisterOCX(FileName: string): Boolean;
  2. var
  3. OCXHand: THandle;
  4. RegFunc: TDllRegisterServer;
  5. begin
  6. OCXHand := LoadLibrary(PChar(FileName));
  7. RegFunc := GetProcAddress(OCXHand, 'DllUnregisterServer');
  8. if @RegFunc <> nil then
  9. Result := RegFunc = S_OK
  10. else
  11. Result := False;
  12. FreeLibrary(OCXHand);
  13. end;

Registrar [MÉTODO 2]


delphi
  1. function RegisterServer(const aDllFileName: string; aRegister: Boolean): Boolean;
  2. type
  3. TRegProc = function: HResult;
  4. stdcall;
  5. const
  6. cRegFuncNameArr: array [Boolean] of PChar =
  7. ('DllUnregisterServer', 'DllRegisterServer');
  8. var
  9. vLibHandle: THandle;
  10. vRegProc: TRegProc;
  11. begin
  12. Result := False;
  13. vLibHandle := LoadLibrary(PChar(aDllFileName));
  14. if vLibHandle = 0 then Exit;
  15. @vRegProc := GetProcAddress(vLibHandle, cRegFuncNameArr[aRegister]);
  16. if @vRegProc <> nil then
  17. Result := vRegProc = S_OK;
  18. FreeLibrary(vLibHandle);
  19. end;

Saludos! @Sir.Dev.A.Lot "Ya he comenzado."


  • 5


#96620 Número de serie de una unidad de disco USB

Escrito por escafandra el 23 octubre 2016 - 12:19

Obtener el número de serie de una unidad USB es un tema buscado en las redes y muy mal documentado. En principio podríamos suponer que la tarea puede hacerse fácilmente con DeviceIoControl IOCTL_STORAGE_GET_MEDIA_SERIAL_NUMBER, pero la realidad es que falla para las unidades de disco USB. cHackAll escribió hace unos años un código que se basaba el leer el registro para encontrar esa información, pero en los actuales S.O. no funciona correctamente. Con motivo de una pregunta en CD, me acordé del antiguo código de cHackAll y me propuse revisar el tema. El código que propongo se basa en la lectura del registro y en verificar si la unidad está "pinchada" en nuestro PC.


El código está probado en WinXP y Win10.


En realidad es una información muy poco útil salvo para aquellos que quieran proteger sus creaciones con una mochila basada en un pendrive.


Este es el código:


delphi
  1. var
  2.  Device: ShortString;
  3.  ValueName: array [0..15] of Char = '\DosDevices\\:';
  4.  
  5.  
  6. const
  7.  IOCTL_VOLUME_GET_VOLUME_DISK_EXTENTS  = $00560000;
  8.  
  9. // Encuentra el número de disco físico que corresponde a una letra de unidad
  10. function GetPhysicalNumOfDrive(Volume: Char): integer;
  11. var
  12.   hFile: THandle;
  13.   Vde: array [0..56] of BYTE;   // VOLUME_DISK_EXTENTS
  14.   BytesReturned: Cardinal;
  15. begin
  16.   Result:= -1;
  17.   hFile:= CreateFile(PAnsiChar('\\.\' + Volume + ':'),0,0,nil, OPEN_EXISTING, 0, 0);
  18.   if hFile <> INVALID_HANDLE_VALUE then
  19.   begin
  20.     if DeviceIoControl(hFile, IOCTL_VOLUME_GET_VOLUME_DISK_EXTENTS, nil, 0, @Vde, SizeOf(Vde), BytesReturned, nil) then
  21.       Result:= PBYTE(DWORD(@Vde)+8)^;
  22.     CloseHandle(hFile);
  23.   end;
  24. end;
  25.  
  26. // Encuentra el número de serie de una letra de unidad para Win10
  27. function GetUSBSerial10(Drive: Char; var SerialNumber: ShortString): LongBool;
  28. var
  29.   hKey: Windows.HKEY;
  30.   Device: ShortString;
  31.   ValueName: array [0..15] of Char;
  32.   Index: Integer;
  33.   Value: Char;
  34.   Size: DWORD;
  35.   i: integer;
  36.   ValueType: DWORD;
  37. begin
  38.   ValueType:= 3;
  39.   Size:= SizeOf(Device);
  40.   Result := False;
  41.   lstrcpy(ValueName, '\DosDevices\\:');
  42.   ValueName[12] := Drive;
  43.   RegOpenKey(HKEY_LOCAL_MACHINE, 'SYSTEM\MountedDevices', hKey);
  44.   i:= RegQueryValueEx(hKey, @ValueName, nil, @ValueType{REG_BINARY}, @Device, @Size);
  45.   RegCloseKey(hKey);
  46.   if i = 0 then
  47.   begin
  48.     i:= SizeOf(Device);
  49.     repeat  dec(i); until Device[i] = '&';  Device[i]:= #0;
  50.     repeat  dec(i); until Device[i] = '#';
  51.     Index := 1;
  52.     repeat
  53.       Value := Device[i + Index * 2];
  54.       SerialNumber[Index]:= Value;
  55.       inc(Index);
  56.     until Value = #0;
  57.     SerialNumber[0]:= CHAR(lstrlen(@SerialNumber[1]));
  58.     Result:= SerialNumber[1] <> #0;
  59.   end;
  60. end;
  61.  
  62. // Modificado del código de cHackAll
  63. function Search(hParent: HKEY; var SubKey: ShortString): LongBool;
  64. var
  65.  hChild: HKEY;
  66.  Index: Cardinal;
  67.  Data: ShortString;
  68.  Size: DWORD;
  69.  ValueType: DWORD;
  70. begin
  71.  ValueType:= 1; //REG_SZ
  72.  Size:= SizeOf(Device);
  73.  Index := 0;
  74.  RegOpenKey(hParent, @SubKey[1], hChild);
  75.  RegQueryValueEx(hChild, 'ParentIdPrefix', nil, @ValueType, @Data[0], @Size);
  76.  Result := not LongBool(lstrcmp(@Data, @Device));
  77.  while not Result and (RegEnumKey(hChild, Index, @SubKey[1], SizeOf(SubKey) - 1) = ERROR_SUCCESS) do
  78.   begin
  79.    Result := Search(hChild, SubKey);
  80.    Inc(Index);
  81.   end;
  82.  RegCloseKey(hChild);
  83. end;
  84.  
  85. // Modificado del código de cHackAll
  86. function usbGetSerial(Drive: Char; var SerialNumber: ShortString): LongBool;
  87. var
  88.  lpSerialNumber: PChar;
  89.  hKey: Windows.HKEY;
  90.  Index: Integer;
  91.  Value: Char;
  92.  Size: DWORD;
  93.  i: integer;
  94.  ValueType: DWORD;
  95. begin
  96.  ValueType:= 3;
  97.  Size:= SizeOf(Device);
  98.  Result := False;
  99.  ValueName[12] := Drive;
  100.  i:= RegOpenKey(HKEY_LOCAL_MACHINE, 'SYSTEM\MountedDevices', hKey);
  101.  RegQueryValueEx(hKey, @ValueName, nil, @ValueType{REG_BINARY}, @Device, @Size);
  102.  RegCloseKey(hKey);
  103.  
  104.  Index := 0;
  105.  repeat if Device[(Index + 3) * 2 + 54] <> '#' then
  106.   Value := Device[Index * 2 + 54] else Value := #0;
  107.   Device[Index] := Value;
  108.   Inc(Index);
  109.  until Value = #0;
  110.  SerialNumber[0] := #0;
  111.  lstrcpy(@SerialNumber[1], 'SYSTEM\CurrentControlSet\Enum\USBSTOR');
  112.  if (Device[0] <> #0) and Search(HKEY_LOCAL_MACHINE, SerialNumber) then
  113.   begin
  114.    lpSerialNumber := @SerialNumber[1];
  115.    repeat Inc(SerialNumber[0]);
  116.     Inc(lpSerialNumber);
  117.     if lpSerialNumber[0] = '&' then
  118.      lpSerialNumber[0] := #0;
  119.    until lpSerialNumber[0] = #0;
  120.    Result := True;
  121.   end;
  122. end;
  123.  
  124. function GetSOVersion: integer;
  125. var
  126.   VerInfo: TOSVersioninfo;
  127. begin
  128.   VerInfo.dwOSVersionInfoSize:= SizeOf(TOSVersionInfo);
  129.   GetVersionEx(VerInfo);
  130.   Result:= VerInfo.dwMajorVersion; // 5 es XP, mayor vista...
  131. end;
  132.  
  133. function GetUSBSerial(Drive: Char; var SerialNumber: ShortString): LongBool;
  134. begin
  135.   if(GetSOVersion > 5) then
  136.     Result:= GetUSBSerial10(Drive, SerialNumber)
  137.   else
  138.     Result:= usbGetSerial(Drive, SerialNumber);
  139. end;

Y un ejemplo de uso:


delphi
  1. procedure TForm1.Edit1KeyPress(Sender: TObject; var Key: Char);
  2. var
  3. SerialNumber: ShortString;
  4. begin
  5. Edit1.Text:='';
  6. Label1.Caption:= '';
  7. if GetPhysicalNumOfDrive(Key) <> -1 then
  8. begin
  9. GetUSBSerial(Key, SerialNumber);
  10. Label1.Caption:= SerialNumber;
  11. end
  12. else MessageBox(Handle, 'Unmounted drive', 'Error', MB_ICONEXCLAMATION);
  13. end;

Subo un proyecto completo con el ejemplo.


Saludos.

Archivos adjuntos


  • 5


#92511 Compartiendo codigo...

Escrito por Agustin Ortu el 21 diciembre 2015 - 10:45

Hola,


Me he creado un repositorio en GitHub en el que ire metiendo clases, funciones, procedimientos, ejemplos y esa clase de yerbas


Ojala pueda mantenerlo actualizado


Gusten tomar lo que quieran :)


Saludos


  • 5


#91914 Richmemo para word

Escrito por El_Chava el 29 octubre 2015 - 03:42

Bueno al fin dí con una solución no se si será la más adecuada pero hace lo que necesito. Para esto se uso un marcador en donde se insertara lo contenido en el richMemo. Al final lo que utilice es que lo que contenga en el richmemo lo coopio al portapapeles y al final realizo un pegado especial en el documento word. Aquí les dejo el código.


delphi
  1. var
  2. Word,marcador,doc1: Variant;
  3. w:widestring;
  4. try
  5. {* a la variable "w" le asigno la ruta donde se encuentra la plantilla a utilizar *}
  6. w:= UTF8Decode(ExtractFilePath(application.ExeName)+'plantillas\Respuesta01.rtf');
  7. Word := CreateOleObject('Word.Application');
  8. (* Añades un documento basado en la plantilla *)
  9. Documento := Word.Documents.Add(w);
  10. Documento := Word.Documents.Item(1);
  11. doc1:= Word.ActiveDocument;
  12. RichMemo1.SelectAll; {Se selecciona todo el texto que contenga el Rich memo}
  13. RichMemo1.CopyToClipboard {Se copia lo seleccionado al portapapeles};
  14. Richmemo1.SelLength:=0 {se quita la selección};
  15. if Doc1.Bookmarks.Exists('prueba') then {Chequea si existen las marcas en el documento}
  16. Begin
  17. Doc1.Bookmarks.Item('prueba').Range.PasteSpecial;
  18. {Se realiza el pegado especial del portapapeles en el marcador creado
  19.  en el documento de word}
  20. end;
  21.  
  22. Word.Visible := true; {Make Word visible}
  23. Clipboard.Clear;{se limpia el portapales}
  24. except
  25. on E: Exception do
  26. ShowMessage(SysToUTF8(E.Message));
  27. end;

Para limpiar el portapaples es necesario que usar el unit Clipbrd. Espero y les sirva este metodo. Saludos. ^\||/


  • 5


#91177 [MULTILENGUAJE] Como colocar las flechitas que indican el orden de columnas d...

Escrito por escafandra el 16 septiembre 2015 - 04:32

Windows tiene previsto un sistema con unos iconos que indican el orden en las columnas de un ListView, ascendente o descendente. No conozco si las últimas versiones de delphi lo incluyen, hasta la versión 7 no es así, de modo que me puse a trabajar en este truco, a raiz de una pregunta similar en un foro dedicado a Builder en el que suelo participar.
 
Esta sería la versión para delphi:

delphi
  1. procedure SetSortIcon(List: TListView; ColumnIndex: integer; Ascending: integer);
  2. const
  3. HDF_SORTDOWN = $0200;
  4. HDF_SORTUP = $0400;
  5. var
  6. hHeader: THANDLE;
  7. HD: HD_ITEM;
  8. begin
  9. hHeader := SendMessage(List.Handle, LVM_GETHEADER, 0, 0);
  10. HD.mask:= HDI_FORMAT;
  11. SendMessage(hHeader, HDM_GETITEM, ColumnIndex, Integer(@HD));
  12. if Ascending = 0 then
  13. HD.fmt:= (HD.fmt and not HDF_SORTUP) or HDF_SORTDOWN
  14. else
  15. HD.fmt:= (HD.fmt and not HDF_SORTDOWN) or HDF_SORTUP;
  16. SendMessage(hHeader, HDM_SETITEM, ColumnIndex, Integer(@HD));
  17. end;


La forma de uso:

delphi
  1. procedure TForm1.ListView1ColumnClick(Sender: TObject; Column: TListColumn);
  2. var
  3. i: integer;
  4. begin
  5. Column.Tag:= Column.Tag xor 1; // 0 descendente y 1 ascendente
  6. SetSortIcon(ListView1, Column.Index, Column.Tag);
  7.  
  8. // Aquí se implementaría la llamada a la función de ordenación de la columna
  9. TListView(Sender).CustomSort(@SortByColumn, Column.Index);
  10. end;

 
Se debe incluir le archivo de recursos para WinXP para que funcione. 
 

Saludos.
  • 5


#90861 Enviar una impresión a una impresora de Red

Escrito por escafandra el 14 agosto 2015 - 06:53

Esta función resuelve la IP encontrando el nombre de la impresora, a partir de ahí puedes usar ese nombre para imprimir. 
 

delphi
  1. uses
  2.   Windows, SysUtils, Winsock, Winspool;
  3.  
  4. type
  5.   APrinterInfo2 = array [0..0] of TPrinterInfo2;
  6.   PAPrinterInfo2 = ^APrinterInfo2;
  7.  
  8. function GetPrinterName(IP: String): String;
  9. var
  10.   Data: TWSADATA;
  11.   He: Phostent;
  12.   Addr: integer;
  13.   List: PAPrinterInfo2; //PPrinterInfo2;
  14.   SizeNeeded, NumItems, Item: DWORD;
  15. begin
  16.   Result:= '';
  17.   if WSAStartup(MAKEWORD(1, 1), Data) = 0 then
  18.   begin
  19.     Addr:= inet_addr(PCHAR(IP));
  20.     if Addr <> INADDR_NONE then
  21.     begin
  22.       He:= gethostbyaddr(@Addr, sizeof(Addr), AF_INET);
  23.       if He <> nil then
  24.         Result:= He.h_name;
  25.     end;
  26.     WSACleanup;
  27.   end;
  28.   if Result <> '' then
  29.   begin
  30.     if pos('.', Result) > 0 then
  31. Result:= copy(Result, 1, pos('.', Result)-1);
  32.     EnumPrinters(PRINTER_ENUM_LOCAL, nil, 2, nil, 0, SizeNeeded, NumItems);
  33.     GetMem(List, SizeNeeded);
  34.     if EnumPrinters(PRINTER_ENUM_LOCAL, nil, 2, List, SizeNeeded, SizeNeeded, NumItems) then
  35.     begin
  36.       for Item:= 0 to NumItems-1 do
  37.       begin
  38.         if List[Item].pPortName = Result then
  39.         begin
  40.           Result:= List[Item].pPrinterName;
  41.           break;
  42.         end;
  43.       end;
  44.     end;
  45.     FreeMem(List);
  46.   end;
  47. end;

Saludos.
  • 5


#90453 imágenes para botones

Escrito por cram el 08 julio 2015 - 09:58

Les dejo algunas imágenes que creé para usar como glyphs para botones con bitmap (TBitmapButtons) o simplemente para acompañar algún control que las necesite.


Están en bmp 24x24 y png 40x40 transparentes y sólidas

Archivo adjunto  botones.jpg   45,72KB   20 descargas


Espero les sirva.


Saludos


Archivos adjuntos


  • 5


#90200 Cotilleando un ListView de otro proceso...

Escrito por escafandra el 25 junio 2015 - 06:33

Leyendo detenidamente la pregunta de look vi un detalle que pretendía que no está contamplado en WinInfo. Se trata de poder leer el contenido de un ListView.

Para esa tarea, Windows tiene previsto el acceso a través de mensajes encapsulados en macros estilo C: List View, la pega es que no funcionan si se trata de acceder desde un proceso distinto, se debe a la compartimentación de la memoria aislada entre procesos. Pudiera parecer que es un escollo insalvable, pero no lo es si "invadimos" el proceso a espiar, para eso están las APIs VirtualAllocEx, WriteProcessMemory y ReadProcessMemory.

Armados con estas APIs y obteniendo el Handle del proceso anfitrión podemos invadir su memoria y extraer los datos que buscamos.

Lo que sigue es un ejemplo que fisgonea en un ListView de un proceso ajeno coniciendo previamente el Handle de ventana de dicho control y las coordenadas del "mouse" donde se encuentra el Item a asaltar, obtenemos los subitems. El sumitem[0] representa el texto principal del Item mientras que números superiores representan los siguientes subitems en orden.

El código está diseñado para encajarlo en WinInfo, que ya se encarga de obtener el Handle y las coordenadas necesarias pero se puede adaptar para uso en otros entronos.
 

delphi
  1. function GetLVText(hListView: HWND; X, Y: integer; iSubItem: Cardinal): String;
  2. var
  3. pid: DWORD;
  4. hProcess: THANDLE;
  5. IInfo: TLVHITTESTINFO;
  6. _IInfo: PLVHITTESTINFO;
  7. Index: integer;
  8. Buffer: array [0..511] of CHAR;
  9. _Buffer: PCHAR;
  10. Item: TLVITEM;
  11. _Item: PLVITEM;
  12. begin
  13. Result:= '';
  14. GetWindowThreadProcessId(hListView, pid);
  15. hProcess:= OpenProcess(PROCESS_VM_OPERATION or PROCESS_VM_READ or
  16. PROCESS_VM_WRITE or PROCESS_QUERY_INFORMATION, FALSE, pid);
  17. if hProcess <> THANDLE(0) then
  18. begin
  19. // Encontramos el índice del LVItem en X, Y
  20. Index:= -1;
  21. IInfo.pt:= Point(10, Y);
  22. _IInfo:= VirtualAllocEx(hProcess, nil, sizeof(TLVHITTESTINFO), MEM_COMMIT, PAGE_READWRITE);
  23. WriteProcessMemory(hProcess, _IInfo, @IInfo, sizeof(TLVHITTESTINFO), PDWORD(0)^);
  24. Index:= ListView_HitTest(hListView, _IInfo^);
  25. if Index >= 0 then
  26. begin
  27. // Encontramos el Texto del Item
  28. _Buffer:= VirtualAllocEx(hProcess, nil, sizeof(Buffer), MEM_COMMIT, PAGE_READWRITE);
  29. _Item:= VirtualAllocEx(hProcess, nil, sizeof(TLVITEM), MEM_COMMIT, PAGE_READWRITE);
  30.  
  31. Item.iSubItem:= iSubItem;
  32. Item.pszText:= _Buffer;
  33. Item.cchTextMax:= sizeof(Buffer);
  34.  
  35. WriteProcessMemory(hProcess, _Item, @Item, sizeof(TLVITEM), PDWORD(0)^);
  36. SendMessage(hListView, LVM_GETITEMTEXT, Index, Cardinal(_Item));
  37. ReadProcessMemory(hProcess, _Buffer, @Buffer[0], sizeof(Buffer), PDWORD(0)^);
  38. Result:= String(Buffer);
  39. // Liberamos memoria del proceso
  40. VirtualFreeEx(hProcess, _Item, 0, MEM_RELEASE);
  41. VirtualFreeEx(hProcess, _Buffer, 0, MEM_RELEASE);
  42. end;
  43. // Liberamos memoria del proceso
  44. VirtualFreeEx(hProcess, _IInfo, 0, MEM_RELEASE);
  45. end;
  46. end;


Saludos.
  • 5


#101001 Eliminar la opción "Ejecutar como Administrador" del menú del botón d...

Escrito por escafandra el 13 abril 2018 - 04:27

Seguro que alguien ha tenido la necesidad de desactivar la opción de "Ejecutar como Administrador" del menú del botón derecho del ratón. Sin ir muy lejos me lo preguntaron recientemente. Una opción para realizar esto es el registro de Windows. Las eliminación de siguientes claves consigue el efecto deseado:

delphi
  1. HKEY_CLASSES_ROOT\batfile\shell\runas
  2. HKEY_CLASSES_ROOT\cmdfile\shell\runas
  3. HKEY_CLASSES_ROOT\cpfile\shell\runas
  4. HKEY_CLASSES_ROOT\exefile\shell\runas
  5. HKEY_CLASSES_ROOT\mscfile\shell\runas

Pero eliminar sin un backup nunca es bueno hablando del registro por lo que guardaremos una copia de las mismas con ayuda del código que publiqué recientemente aquí : RegCopyKey
 
El siguiente código realiza la rarea para claves individuales:

delphi
  1. function RegHideRunAs(SubKey: String): integer;
  2. var
  3. SrcKey, TrgKey: HKEY;
  4. begin
  5. Result:= RegOpenKeyExA(HKEY_CLASSES_ROOT, PAnsiChar(SubKey + '\shell\runas') , 0, KEY_READ, SrcKey);
  6. if Result = ERROR_SUCCESS then
  7. begin
  8. Result:= RegOpenKeyExA(HKEY_CLASSES_ROOT, PAnsiChar(SubKey), 0, KEY_READ, TrgKey);
  9. if Result = ERROR_SUCCESS then
  10. begin
  11. Result:= RegCopyKey(SrcKey, TrgKey, 'BkRunAs');
  12. RegCloseKey(SrcKey);
  13. end;
  14. RegCloseKey(TrgKey);
  15. end;
  16. if Result = ERROR_SUCCESS then
  17. RegDeleteTreeA(HKEY_CLASSES_ROOT, PAnsiChar(SubKey + '\shell\runas'));
  18. end;
  19.  
  20. function RegRestoreRunAs(SubKey: String): integer;
  21. var
  22. SrcKey, TrgKey: HKEY;
  23. begin
  24. Result:= RegOpenKeyExA(HKEY_CLASSES_ROOT, PAnsiChar(SubKey + '\BkRunAs'), 0, KEY_READ, SrcKey);
  25. if Result = ERROR_SUCCESS then
  26. begin
  27. Result:= RegOpenKeyExA(HKEY_CLASSES_ROOT, PAnsiChar(SubKey + '\shell'), 0, KEY_READ, TrgKey);
  28. if Result = ERROR_SUCCESS then
  29. begin
  30. Result:= RegCopyKey(SrcKey, TrgKey, 'runas');
  31. RegCloseKey(SrcKey);
  32. end;
  33. RegCloseKey(TrgKey);
  34. end;
  35. if Result = ERROR_SUCCESS then
  36. RegDeleteTreeA(HKEY_CLASSES_ROOT, PAnsiChar(SubKey + '\BkRunAs'));
  37. end;

Y la siguiente función realiza la tarea conjunta:

delphi
  1. function ShowRunAs(Visible: boolean): integer;
  2. begin
  3. {
  4. HKEY_CLASSES_ROOT\batfile\shell\runas
  5. HKEY_CLASSES_ROOT\cmdfile\shell\runas
  6. HKEY_CLASSES_ROOT\cpfile\shell\runas
  7. HKEY_CLASSES_ROOT\exefile\shell\runas
  8. HKEY_CLASSES_ROOT\mscfile\shell\runas
  9. }
  10. if Visible then
  11. begin
  12. RegRestoreRunAs('batfile');
  13. RegRestoreRunAs('cmdfile');
  14. RegRestoreRunAs('cpfile');
  15. RegRestoreRunAs('exefile');
  16. RegRestoreRunAs('mscfile');
  17. end
  18. else
  19. begin
  20. RegHideRunAs('batfile');
  21. RegHideRunAs('cmdfile');
  22. RegHideRunAs('cpfile');
  23. RegHideRunAs('exefile');
  24. RegHideRunAs('mscfile');
  25. end;
  26. end;

Pues ya tenemos la herramienta para esconder y restaurar la opción "Ejecutar como Administrador" del menú del botón derecho del ratón.
 
 
Saludos.

PD/ Edito para unificar en AnsiChar
  • 5


#99903 [TUTORIAL] Arduino C++ y Puerto serie

Escrito por Meta el 14 julio 2017 - 10:33

port-1721801.png


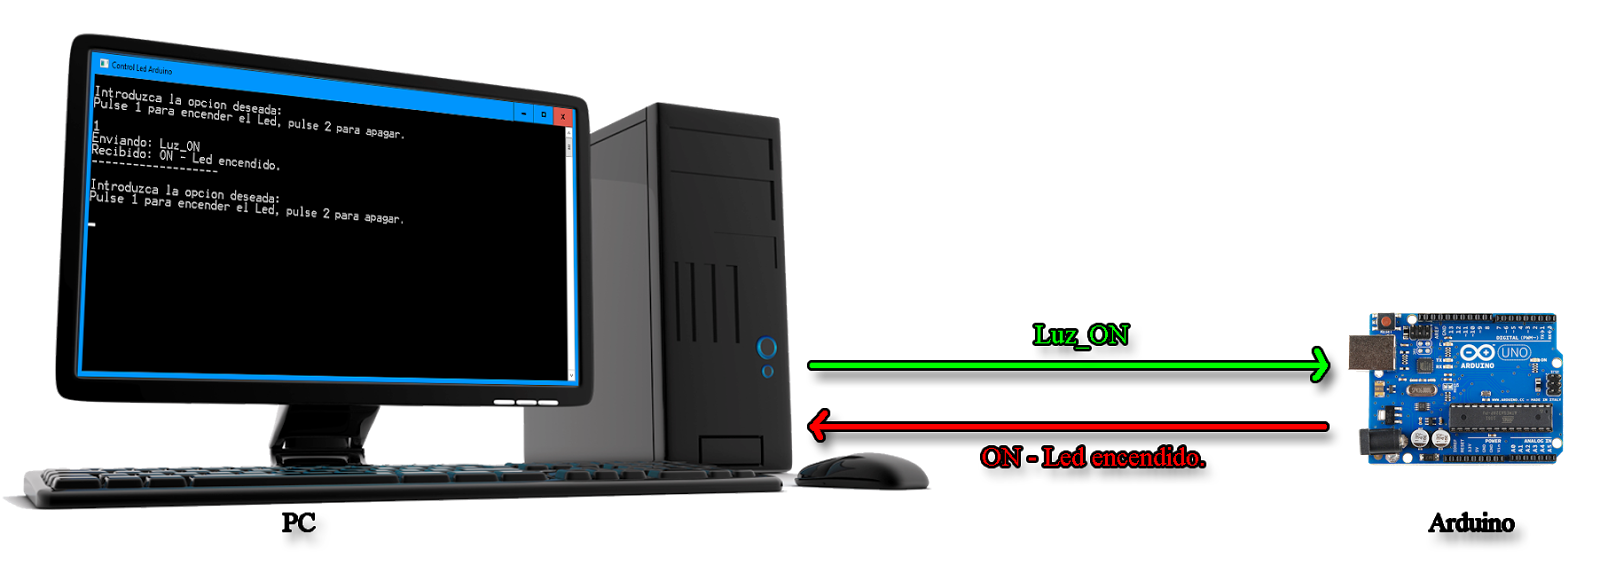
Tutorial Arduino C++ y Puerto serie. Puedes hacer controlar Arduino y el puerto serie desde el lenguaje C++ Win32. Hay tres IDE para elegir para crear tu propio programa en C++ como Visual Studio 2017, Code::Blocks y C++ Builder Starter.

Concepto.png

Antes que nada saber que puerto usamos:
// Para crear conexión con los puertos COM1 - COM9.
// Serial* Arduino = new Serial("COM7");

// Para crear conexión con los puertos COM10 en adelante.
// Serial* Arduino = new Serial("\\\\.\\COM10");

Abrir conexión del puerto:
Puerto->IsConnected()

Enviar información a Arduino:
// Encener luz.
cout << "Enviando: " << Luz_ON << endl; // Muestra en pantalla textos.
Puerto->WriteData(Luz_ON, sizeof(Luz_ON) - 1); // Envía al puerto el texto "Luz_ON".

Código de Arduino:


php
  1. // Encendido y apagado del Led 13 mediante puerto serie.
  2.  
  3. const byte Led = 13; // Declaramos la variable pin del Led.
  4. char caracter;
  5. String comando;
  6.  
  7. void setup()
  8. {
  9. pinMode(Led, OUTPUT); // Inicializa el pin del LED como salida:
  10. Serial.begin(115200); // Puerto serie 115200 baudios.
  11. }
  12.  
  13. void loop()
  14. {
  15. /*
  16.   Voy leyendo carácter a carácter lo que se recibe por el canal serie
  17.   (mientras llegue algún dato allí), y los voy concatenando uno tras otro
  18.   en una cadena. En la práctica, si usamos el "Serial monitor" el bucle while
  19.   acabará cuando pulsamos Enter. El delay es conveniente para no saturar el
  20.   canal serie y que la concatenación se haga de forma ordenada.
  21.   */
  22. while (Serial.available() > 0)
  23. {
  24. caracter = Serial.read();
  25. comando.concat(caracter);
  26. delay(10);
  27. }
  28.  
  29. /*
  30.   Una vez ya tengo la cadena "acabada", compruebo su valor y hago que
  31.   la placa Arduino reacciones según sea este. Aquí podríamos hacer lo
  32.   que quisiéramos: si el comando es "tal", enciende un Led, si es cual,
  33.   mueve un motor... y así.
  34.   */
  35.  
  36. // Si le llega el mensaje Luz_ON.
  37. if (comando.equals("Luz_ON") == true)
  38. {
  39. digitalWrite(Led, HIGH); // Enciende el Led 13.
  40. Serial.write("ON - Led encendido."); // Envía este mensaje a C++.
  41. }
  42.  
  43. // Si le llega el mensaje Luz_ON.
  44. if (comando.equals("Luz_OFF") == true)
  45. {
  46. digitalWrite(Led, LOW); // Apaga el Led 13.
  47. Serial.write("OFF - Led apagado. "); // Envía este mensaje a C++.
  48. }
  49.  
  50. // Limpiamos la cadena para volver a recibir el siguiente comando.
  51. comando = "";
  52. }

Código C++:


php
  1. #include
  2. #include
  3. #include
  4. #include "SerialClass.h"
  5. using namespace std;
  6.  
  7. void main()
  8. {
  9. // Título de la ventana
  10. SetConsoleTitle("Control Led Arduino - Visual Studio C++ 2017");
  11.  
  12. // Puerto serie.
  13. Serial* Puerto = new Serial("COM4");
  14.  
  15. // Comandos para Arduino.
  16. char Luz_ON[] = "Luz_ON"; // Envía "Luz_ON" al puerto serie.
  17. char Luz_OFF[] = "Luz_OFF";
  18. char lectura[50] = "\0"; // Guardan datos de entrada del puerto.
  19.  
  20. int opc; // Guarda un 1 o 2 tipo entero queintroduces desde la consola.
  21.  
  22. while (Puerto->IsConnected())
  23. {
  24. cout << endl; // Retorno.
  25. cout << "Introduzca la opcion deseada: " << endl;
  26. cout << "Pulse 1 para encender el Led, pulse 2 para apagar." << endl << endl; // Muestra texto en pantalla.
  27.  
  28. cin >> opc; // Aquí introduces un número, el 1 o el 2.
  29.  
  30. switch (opc) // Espera recibir un 1 o un 2.
  31. {
  32. case 1:
  33. // Encener luz.
  34. cout << "Enviando: " << Luz_ON << endl; // Muestra en pantalla textos.
  35. Puerto->WriteData(Luz_ON, sizeof(Luz_ON) - 1); // Envía al puerto el texto "Luz_ON".
  36. break;
  37.  
  38. case 2:
  39. // Apagar luz.
  40. cout << "Enviando: " << Luz_OFF << endl;
  41. Puerto->WriteData(Luz_OFF, sizeof(Luz_OFF) - 1);
  42. break;
  43.  
  44. default: // Si haz pulsado otro número distinto del 1 y 2, muestra
  45. cout << "Puse del 1 al 2."; // este mensaje.
  46. }
  47.  
  48.  
  49. Sleep(500);
  50. int n = Puerto->ReadData(lectura, 49); // Recibe datos del puerto serie.
  51. if (n > 0)
  52. {
  53. lectura[n + 1] = '\0'; // Limpia de basura la variable.
  54. cout << "Recibido: " << lectura << endl; // Muestra en pantalla dato recibido.
  55. cout << "-------------------" << endl;
  56. }
  57.  
  58. cin.ignore(256, '\n'); // Limpiar buffer del teclado.
  59. }
  60. }

61.png


Ver Visor.

Ver vídeo.

Ver PDF.

Un cordial saludo.


  • 4


#99648 Acceso a Base de Datos con Delphi Starter

Escrito por egostar el 02 junio 2017 - 08:26

Pues eso,

He publicado un artículo donde muestro conmo acceder a una base de datos desde Delphi Starter el cual no cuenta con ésta facilidad pero que al permitir la instalación de componentes de terceros es posible hacerlo.


En éste tutorial utilizo los componentes Zeos para acceder a una base de datos SQLite.


La idea de hacer este tipo de tutoriales es un intento de acercar a las nuevas generaciones a aprender y utilizar Delphi, ciertamente la Edición Starter viene muy limitada pero para iniciar el aprendizaje de Delphi y para desarrollar aplicaciones para Windows me parece una buena alternativa.
 
Ojala y sea de utilidad. :)
 

Acceso a base de datos SQLite desde Delphi Starter

 
Saludos


  • 4


#99616 Curso introductorio a Lazarus y Delphi en UDEMY

Escrito por axesys el 28 mayo 2017 - 01:20

Hola a todos, les comparto un cupón del 100% de descuento para mi primer curso de Delphi en UDEMY, espero que sea de su agrado.


https://www.udemy.co...uponCode=DELPHI


Saludos


  • 4


#99379 Delphi Novedades Abril 2017

Escrito por poliburro el 28 abril 2017 - 08:30

Tomado de: https://goo.gl/N9fbaU


embarcadero_logo.gif?zoom=2&resize=245%2

Delphi continúa en el Top Ten.

El mes de marzo Embarcadero publicó una nota mencionando que Delphi se encontraba dentro del Top ten de lenguajes más populares. En abril, la tendencia continua manteniendo a Delphi/Object Pascal en la posición 9 del índice.

tiobe-delphi-abril.png?resize=678%2C85

Alianza de Embarcadero con Mitov Software.

Embarcadero anunció su alianza con Mitov Software para integrar su suite de componentes de terceros la librería de AI IntelligenceLab que permite a los desarrolladores desarrollar aplicaciones para filtrar spam, de visión por computadora, reconocimiento de voz o cualquier otra tarea relacionada con IA. Saber más.

Finalizada la competencia para elegir el logo de la camiseta oficial de Tokio.

Tras una muy reñida competencia, la competencia para seleccionar el logo de la camisa oficial para Tokio ha finalizado. Los tres han sido:

tshirt-tokio.png?resize=626%2C218


Delphi Tokio Starter.

Ya se puede descargar la versión gratuita de Delphi que permite a los desarrolladores crear aplicaciones en windows. Enlace de Descarga.


LOGO%20DA-2016-2.png?zoom=2&resize=400%2

  • Proyecto PicPas Actualizado. El creador de este compilador de pascal para microcontroladores de gama media ha anunciado una nueva versión. Ver.
  • Speech Recognizer. Nos comparten el código fuente de un proyecto de reconocimiento de voz con Delphi en Android. Ver.
  • Editor multiplataforma. Nos comparten información del proyecto open source Trolledge desarrollado con Delphi. Ver.
  • fpcupdeluxe es una herramienta con interfaz gráfica que se encarga de administrar instalaciones de FreePascal y Lazarus. Ver


blogosphere-1.png?resize=225%2C129

Serialización JSON en Tokyo. 

Artículo escrito por Agustín Ortu sobre las unidades System.JSON.Serializers y System.JSON.Converters que sirven para trabajar con JSON, en particular, convertir objetos Delphi a JSON, y también el proceso inverso, crear un objeto Delphi a partir de una estructura JSON. Ver.

Consumir un servicio web con Delphi 10.2 Starter y cURL.

Artículo escrito por Eliseo González que nos muestra de qué manera consumir un servicio web de Banxico para determinar el tipo de cambio de una moneda. Ver.

El plugin TestInsight.

En este artículo Agustín nos habla sobre el plugin TestInsight que se trata de un pequeño experto que se integra en el IDE y permite correr los test de unidad y ver los resultados, directamente desde el IDE, y no ejecutándolos en un programa externo. Ver.

Un nuevo compilador para microcontroladores.

Tito Hinostroza describe en su blog los argumentos que lo llevaron a crear un compilador de lenguaje pascal para microcontroladores así como sus ventajas. Ver.


  • 4


#97054 Encriptando funciones

Escrito por escafandra el 19 noviembre 2016 - 08:39

Voy a tratar de explicar como proteger una app encriptando una función vital para el programa. La clave de descifrado dependerá de la clave de la licencia.
 
Imaginemos un código como este en el que una función es vital porque importa dinámicamente un procedimiento esencial de una dll:


delphi
  1. unit Unit1;
  2.  
  3. interface
  4.  
  5. uses
  6. Windows, Messages, SysUtils, Variants, Classes, Graphics, Controls, Forms,
  7. Dialogs, StdCtrls;
  8.  
  9. type
  10. TForm1 = class(TForm)
  11. Edit1: TEdit;
  12. Button1: TButton;
  13. procedure FormCreate(Sender: TObject);
  14. private
  15. { Private declarations }
  16. public
  17. { Public declarations }
  18. end;
  19.  
  20. var
  21. Form1: TForm1;
  22.  
  23. type PLogueado = procedure; stdcall;
  24.  
  25. implementation
  26.  
  27. {$R *.dfm}
  28. var
  29. Logueado: PLogueado;
  30.  
  31.  
  32. procedure Vital;
  33. var
  34. hLib: HMODULE;
  35. begin
  36. hLib:= LoadLibrary('UnaDll.dll');
  37. Logueado:= GetProcAddress(hLib, 'Logueado');
  38. if @Logueado <> nil then
  39. Logueado;
  40. end;}
  41.  
  42. procedure TForm1.FormCreate(Sender: TObject);
  43. begin
  44. Vital;
  45. end;
  46.  
  47. end.

Para el ejemplo, esta será la dll:


delphi
  1. library UnaDll;
  2.  
  3. uses
  4. Windows;
  5.  
  6. {$R *.res}
  7.  
  8.  
  9. procedure Logueado;
  10. begin
  11. MessageBox(0, 'El programa funcionará correctamente', 'Eureca', MB_OK);
  12. end;
  13.  
  14. exports
  15. Logueado;
  16.  
  17. begin
  18. end.


Ahora vamos a cambiar las cosas para encriptar el procedimiento Vital. Añadimos una función o procedimiento de cifrado, otro de descifrado y otro para guardar el binario cifrado de Vital. El procedimiento FinVital hay que dejarlo justo al final de Vital:


delphi
  1. unit Unit1;
  2.  
  3. interface
  4.  
  5. uses
  6.   Windows, Messages, SysUtils, Variants, Classes, Graphics, Controls, Forms,
  7.   Dialogs, StdCtrls;
  8.  
  9. type
  10.   TForm1 = class(TForm)
  11.     Edit1: TEdit;
  12.     Button1: TButton;
  13.     procedure FormCreate(Sender: TObject);
  14.   private
  15.     { Private declarations }
  16.   public
  17.     { Public declarations }
  18.   end;
  19.  
  20. var
  21.   Form1: TForm1;
  22.  
  23. type PLogueado = procedure; stdcall;
  24.  
  25. implementation
  26.  
  27. {$R *.dfm}
  28. var
  29. Logueado: PLogueado;
  30.  
  31. // Una función de cifrado simétrico...
  32. procedure Crypt(Source: Pointer; Size: Cardinal; Password: PCHAR; _Mod: integer);
  33. var
  34.   S: PCHAR;
  35.   len, n: integer;
  36. begin
  37.    S:= Source;
  38.    len:= lstrlen(Password);
  39.    for n:=0 to Size-1 do
  40.    begin
  41.      S[n]:= CHAR(integer(S[n]) xor integer(Password[_Mod mod len]));
  42.      inc(_Mod);
  43.    end;
  44. end;
  45.  
  46. procedure Vital;
  47. var
  48.   hLib: HMODULE;
  49. begin
  50.   hLib:= LoadLibrary('UnaDll.dll');
  51.   Logueado:= GetProcAddress(hLib, 'Logueado');
  52.   if @Logueado <> nil then
  53.     Logueado;
  54. end;}
  55. // Este procedimiento inservible nos ayudará a encontrar el tamaño asm de Vital
  56. procedure FinVital; begin end;
  57.  
  58. // Este procedimiento copia Vital en un buffer, lo encripta y lo guarda en un archivo binario.
  59. procedure ExtraeVital;
  60. var
  61.   hFile: THANDLE;
  62.   Size: integer;
  63.   Buffer: PBYTE;
  64. begin
  65.   hFile:= CreateFile('Vital.bin', GENERIC_WRITE, 0, nil, CREATE_ALWAYS, FILE_FLAG_WRITE_THROUGH, 0);
  66.   if hFile <> INVALID_HANDLE_VALUE then
  67.   begin
  68.     //Calculamos el tamaño de Vital
  69.     Size:= UINT(@FinVital) - UINT(@Vital);
  70.     Buffer:= GetMemory(Size);
  71.     CopyMemory(Buffer, @Vital, Size);
  72.     Crypt(Buffer, Size, 'escafandra', 0);
  73.     _lwrite(hFile, PAnsiChar(Buffer), Size);
  74.     CloseHandle(hFile);
  75.     FreeMemory(Buffer);
  76.   end;
  77. end;
  78.  
  79. // Descifra Vital en su propia localización
  80. procedure DescifraVital;
  81. var
  82.   Size: integer;
  83.   OldProtect: DWORD;
  84. begin
  85.   //Calculamos el tamaño de Vital
  86.   Size:= UINT(@FinVital) - UINT(@Vital);
  87.   VirtualProtectEx(DWORD(-1), @Vital, Size, PAGE_EXECUTE_READWRITE, @OldProtect);
  88.   Crypt(@Vital, Size, PCHAR(Form1.Edit1.Text), 0);
  89.   VirtualProtectEx(DWORD(-1), @Vital, Size, OldProtect, nil);
  90. end;
  91.  
  92. procedure TForm1.FormCreate(Sender: TObject);
  93. begin
  94.   ExtraeVital;
  95.   DescifraVital;
  96.   Vital;
  97. end;
  98.  
  99. end.

Ahora, con ayuda de alguna app que nos pase un binario a texto (FileToCode) hardcodeamos Vital con el resultado obtenido:


delphi
  1. unit Vital_;
  2.  
  3. interface
  4.  
  5. uses Windows;
  6.  
  7. var
  8. Vital_Size: integer = 80;
  9.  
  10. Vital_Bytes: array [0..79] of BYTE =
  11. (
  12. $30, $F8, $8F, $30, $0E, $65, $9F, $20, $72, $89, $2B, $1D, $98, $9E, $EF, $24,
  13. $92, $0C, $62, $90, $21, $73, $E8, $24, $9A, $31, $86, $C1, $1F, $9A, $9A, $D0,
  14. $BB, $4A, $23, $61, $ED, $59, $AA, $4A, $20, $73, $63, $15, $60, $9E, $7B, $BC,
  15. $59, $24, $65, $2A, $3E, $A2, $66, $61, $3B, $0A, $13, $25, $09, $1F, $4D, $05,
  16. $0A, $0D, $6E, $64, $3E, $0E, $02, $06, $06, $00, $02, $0E, $6E, $64, $72, $61
  17. );
  18. implementation
  19. end.

El procedimiento VItal quedará como sigue:


delphi
  1. procedure Vital;
  2. asm
  3. db $30, $F8, $8F, $30, $0E, $65, $9F, $20, $72, $89, $2B, $1D, $98, $9E, $EF, $24;
  4. db $92, $0C, $62, $90, $21, $73, $E8, $24, $9A, $31, $86, $C1, $1F, $9A, $9A, $D0;
  5. db $BB, $4A, $23, $61, $ED, $59, $AA, $4A, $20, $73, $63, $15, $60, $9E, $7B, $BC;
  6. db $59, $24, $65, $2A, $3E, $A2, $66, $61, $3B, $0A, $13, $25, $09, $1F, $4D, $05;
  7. db $0A, $0D, $6E, $64, $3E, $0E, $02, $06, $06, $00, $02, $0E, $6E, $64, $72, $61;
  8. end;

Solo quede hacer tres cosas, sustituir el el código fuente Vital por su nueva implementación "justo en su mismo lugar", trucar ExtraeVital para que no guarde archivos y cambiar la cadena de cifrado por otra cosa de un carácter, ¡no debemos dejarla expuesta!. Este paso es crucial, no debemos alterar mucho el código porque hay que recordar los saltos relativos asm. Cuando recompilemos al gún salto o llamada call puede cambiar su dirección relativa, por lo tanto el código final no puede alterarse mucho.Hay que tener cuidado de dejar todos los procedimientos donde están:
 
Este es el resultado final:


delphi
  1. unit Unit1;
  2.  
  3. interface
  4.  
  5. uses
  6. Windows, Messages, SysUtils, Variants, Classes, Graphics, Controls, Forms,
  7. Dialogs, StdCtrls;
  8.  
  9. type
  10. TForm1 = class(TForm)
  11. Edit1: TEdit;
  12. Button1: TButton;
  13. procedure FormCreate(Sender: TObject);
  14. private
  15. { Private declarations }
  16. public
  17. { Public declarations }
  18. end;
  19.  
  20. var
  21. Form1: TForm1;
  22.  
  23. type PLogueado = procedure; stdcall;
  24.  
  25. implementation
  26.  
  27. {$R *.dfm}
  28. var
  29. Logueado: PLogueado;
  30.  
  31. procedure Crypt(Source: Pointer; Size: Cardinal; Password: PCHAR; _Mod: integer);
  32. var
  33. S: PCHAR;
  34. len, n: integer;
  35. begin
  36. S:= Source;
  37. len:= lstrlen(Password);
  38. for n:=0 to Size-1 do
  39. begin
  40. S[n]:= CHAR(integer(S[n]) xor integer(Password[_Mod mod len]));
  41. inc(_Mod);
  42. end;
  43. end;
  44.  
  45.  
  46. procedure Vital;
  47. asm
  48. db $30, $F8, $8F, $30, $0E, $65, $9F, $20, $72, $89, $2B, $1D, $98, $9E, $EF, $24;
  49. db $92, $0C, $62, $90, $21, $73, $E8, $24, $9A, $31, $86, $C1, $1F, $9A, $9A, $D0;
  50. db $BB, $4A, $23, $61, $ED, $59, $AA, $4A, $20, $73, $63, $15, $60, $9E, $7B, $BC;
  51. db $59, $24, $65, $2A, $3E, $A2, $66, $61, $3B, $0A, $13, $25, $09, $1F, $4D, $05;
  52. db $0A, $0D, $6E, $64, $3E, $0E, $02, $06, $06, $00, $02, $0E, $6E, $64, $72, $61;
  53. end;
  54. {
  55. procedure Vital;
  56. var
  57.   hLib: HMODULE;
  58. begin
  59.   hLib:= LoadLibrary('UnaDll.dll');
  60.   Logueado:= GetProcAddress(hLib, 'Logueado');
  61.   if @Logueado <> nil then
  62.   Logueado;
  63. end;
  64. }
  65. procedure FinVital; begin end;
  66.  
  67. procedure ExtraeVital;
  68. var
  69. hFile: THANDLE;
  70. Size: integer;
  71. Buffer: PBYTE;
  72. begin
  73. hFile:= 0; // Un Handle de archivo nulo evita que se ejecute este procedimiento
  74. CreateFile('Vital.bin', GENERIC_WRITE, 0, nil, CREATE_ALWAYS, FILE_FLAG_WRITE_THROUGH, 0);
  75. if hFile <> INVALID_HANDLE_VALUE then
  76. begin
  77. //Calculamos el tamaño de Vital
  78. Size:= UINT(@FinVital) - UINT(@Vital);
  79. Buffer:= GetMemory(Size);
  80. CopyMemory(Buffer, @Vital, Size);
  81. Crypt(Buffer, Size, '?', 0);
  82. _lwrite(hFile, PAnsiChar(Buffer), Size);
  83. CloseHandle(hFile);
  84. FreeMemory(Buffer);
  85. end;
  86. end;
  87.  
  88. procedure DescifraVital;
  89. var
  90. Size: integer;
  91. OldProtect: DWORD;
  92. begin
  93. //Calculamos el tamaño de Vital
  94. Size:= UINT(@FinVital) - UINT(@Vital);
  95. VirtualProtectEx(DWORD(-1), @Vital, Size, PAGE_EXECUTE_READWRITE, @OldProtect);
  96. Crypt(@Vital, Size, PCHAR(Form1.Edit1.Text), 0);
  97. VirtualProtectEx(DWORD(-1), @Vital, Size, OldProtect, nil);
  98. end;
  99.  
  100. procedure TForm1.FormCreate(Sender: TObject);
  101. begin
  102. ExtraeVital;
  103. DescifraVital;
  104. Vital;
  105. end;
  106.  
  107. end.

No hay condicionales, sólo una dependencia. Si Vital no es desencriptada correctamente la app dará una excepción o se colgará. Vital no se ejecutará alterando definitivamente el programa.
 
Para implementarlo en una app, habra que hacerlo en la versión liberada y probar que funciona.
 
Recordar que si falla es que no hemos tenido cuidado con los JMP y CALL relativos.
 
La fortaleza de la protección la dará el sistema de cifrado ejegido, yo he usado para el ejemplo un método simétrico XOR, no es el más apropiado pero para el ejemplo sirve.
 
Ahora os reto a cojer el ejecutable y crakearlo para que funcione la función Vital. No valen las trampas, sólo se puede usar el ejecutable.    :dlaug: *-) :D :D :D
Espero que os sirva u os de nuevas ideas para vuestras protecciones.
 
 
Subo el ejemplo que he escrito.


Saludos.

Archivos adjuntos


  • 4


#95714 Delphi Academy - Latinoamérica

Escrito por egostar el 07 octubre 2016 - 03:56

Pues eso.....


barraEDM-esp.png


Consejos prácticos de programación, trucos y técnicas que se pueden utilizar ahora! Usted está invitado a unirse a los expertos de Embarcadero cada 15 días para tutoriales de 30 minutos sobre el desarrollo de software para Windows, Mac, Android y iOS.


Calendario completo y el registro


Saludos


  • 4


#96800 TPelota

Escrito por escafandra el 06 noviembre 2016 - 02:55

Os presento una clase pelota que simula el comportamiento real de una pelota confinada en una ventana rebotando por sus paredes. Simula el movimiento uniformemente acelerado y el giro de la pelota, que se ve afectado por los choques. Se puede incluir un coeficiente de rozamiento, en cuyo caso, la pelota termina cayendo y rodando por el suelo hasta detenerse.


En principio usa como imagen un balón de fútbol, pero puede usarse otra como muestra el ejemplo adjunto.


El código lo escribí el año pasado como diversión y para mostrar a mi hijo el movimiento uniformemente acelerado, y como simularlo jugando con las leyes físicas. Aunque se puede mejorar, para mis propósitos salió bastante redondo.


Finalmente se me ocurrió escribir una broma en la que el escritorio se va llenando de pelotas que se multiplican cuando una cae y se para.


Os muestro el código de la clase:


delphi
  1. unit Pelota;
  2.  
  3. interface
  4.  
  5. uses
  6. Windows, Messages;
  7.  
  8. type
  9. TBox = (
  10. ParedIzquierda,
  11. Techo,
  12. ParedDerecha,
  13. Suelo
  14. );
  15.  
  16. UINT_PTR = DWORD; // Para 64bits
  17.  
  18. function sWinProc(Wnd: HWND; uMsg: UINT; wParam: WPARAM; lParam: LPARAM): DWORD; stdcall;
  19. procedure sTimerProc(Wnd: HWND; uMsg: UINT; idEvent: UINT_PTR; dwTime: DWORD); stdcall;
  20.  
  21. type
  22. TPelota = class;
  23.  
  24. TWallEvent = procedure(Pelota: TPelota; Pared: TBox; var Rebote: BOOL) of object;
  25. TMissingEvent = procedure(Pelota: TPelota; Pared: TBox) of object;
  26. TStopEvent = procedure(Pelota: TPelota) of object;
  27.  
  28. TPelota = class
  29. private
  30. gdiplusToken: DWORD;
  31. Left, Top, Width, Height: integer;
  32. Rebote: BOOL;
  33. AutoTimer: BOOL;
  34. CR: double; // Cte de rotación : 360/(PI*Diámetro);
  35. FR: double; // Factor de rotación en bote
  36. Ao: double; // Angulo de rotación inicial;
  37. Bitmap, BitmapBak: HBITMAP; // Bitmap de la pelota
  38. BitmapDC, BitmapDCBak: HDC; // HDC de los Bitmaps
  39. function CreateBitmap(FileName: PWCHAR): HBITMAP;
  40. function WinProc(Wnd: HWND; uMsg: UINT; wParam: WPARAM; lParam: LPARAM): DWORD; stdcall;
  41. procedure TimerProc(Wnd: HWND; uMsg: UINT; idEvent: UINT_PTR; dwTime: DWORD); stdcall;
  42. public
  43. CanDestroy: BOOL;
  44. Handle: THANDLE;
  45. OnStop: TStopEvent; // Evento: Cuando la pelota se para
  46. OnWall: TWallEvent; // Evento: Cuando la pelota alcanza la pared
  47. OnMissing: TMissingEvent; // Evento: Cuando la pelota sale fuera de su parent
  48. X,Y: double; // Posición precisa de la pelota
  49. Vox: double; // Velocidad inicial X
  50. Voy: double; // Velocidad inicial Y
  51. CF: double; // Coefeciente de frenada en bote
  52.  
  53. constructor Create(hParent: HWND; Visible: BOOL = true; AutoTimer: BOOL = false; FileName: PWCHAR = nil);
  54. destructor Destroy; override;
  55.  
  56. procedure Move(t: double); // Movimiento en un tiempo t
  57. procedure SetVisible(V: BOOL); // Visibilidad
  58. procedure SetAutoTimer(V: BOOL); // Timer interno
  59. end;
  60.  
  61.  
  62. // GDI+ Flat API...
  63. function GdiplusStartup(var GdiToken: DWORD; Startup, Output: PBYTE): Cardinal; stdcall external 'gdiplus';
  64. procedure GdiplusShutdown(GdiToken: DWORD); stdcall external 'gdiplus';
  65. function GdipCreateBitmapFromHBITMAP(hbm: HBITMAP; hpal: HPALETTE; var GBitmap: THANDLE): Cardinal; stdcall external 'gdiplus';
  66. function GdipCreateHBITMAPFromBitmap(GBitmap: THANDLE; var hBitmap: HBITMAP; BKColor: DWORD): DWORD; stdcall external 'gdiplus';
  67. function GdipDisposeImage(image: THANDLE): Cardinal; stdcall external 'gdiplus';
  68. function GdipImageRotateFlip(image: THANDLE; rfType: Cardinal): Cardinal; stdcall external 'gdiplus';
  69. function GdipCreateFromHDC(DC: HDC; var Graphics: Pointer): Cardinal; stdcall external 'gdiplus';
  70. function GdipRotateWorldTransform(graphics: Pointer; angle: Single; order: Cardinal): Cardinal; stdcall external 'gdiplus';
  71. function GdipTranslateWorldTransform(graphics: Pointer; sx, sy: Single; order: Cardinal): Cardinal; stdcall external 'gdiplus';
  72. function GdipDrawImage(graphics: Pointer; image: THANDLE; sx, sy: Single): Cardinal; stdcall external 'gdiplus';
  73. function GdipDeleteGraphics(graphics: Pointer): Cardinal; stdcall external 'gdiplus';
  74. function GdipDrawImageRect(graphics: Pointer; Image: THANDLE; x, y, w, h: Single): Cardinal; stdcall external 'gdiplus';
  75.  
  76. function GdipCreateBitmapFromFile(lpFileName: PWCHAR; var GBitmap: THANDLE): DWORD; stdcall external 'gdiplus';
  77.  
  78.  
  79. implementation
  80. {$R *.res}
  81.  
  82. function CreateHBITMAPFromFile(FileName: PWCHAR): HBITMAP;
  83. var
  84. GBitmap: THANDLE;
  85. begin
  86. Result:= 0;
  87. GdipCreateBitmapFromFile(FileName, GBitmap);
  88. GdipCreateHBITMAPFromBitmap(GBitmap, Result, 0);
  89. GdipDisposeImage(GBitmap);
  90. end;
  91.  
  92. procedure RotateDC(DC: HDC; x, y, Angle: Single);
  93. var
  94. Bitmap: HBITMAP;
  95. GBitmap: THANDLE;
  96. Graphics: Pointer;
  97. BitmapData: TagBITMAP;
  98. Rect: TRect;
  99. begin
  100. Bitmap:= GetCurrentObject(DC, OBJ_BITMAP);
  101. GetObject(Bitmap, sizeof(TagBITMAP), @BitmapData);
  102. Rect.Left:= 0; Rect.Right:= BitmapData.bmWidth; Rect.Top:= 0; Rect.Bottom:= BitmapData.bmHeight;
  103. GdipCreateBitmapFromHBITMAP(Bitmap, 0, GBitmap);
  104. FillRect(DC, Rect, 0);
  105. GdipCreateFromHDC(DC, Graphics);
  106. GdipTranslateWorldTransform(Graphics, -x, -y, 0);
  107. GdipRotateWorldTransform(Graphics, Angle, 1);
  108. GdipTranslateWorldTransform(Graphics, x, y, 1);
  109. GdipDrawImage(Graphics, GBitmap, 0, 0);
  110. GdipDisposeImage(GBitmap);
  111. GdipDeleteGraphics(Graphics);
  112. end;
  113.  
  114. //---------------------------------------------------------------------------
  115.  
  116. function sWinProc(Wnd: HWND; uMsg: UINT; wParam: WPARAM; lParam: LPARAM): DWORD; stdcall;
  117. var
  118. Pelota: TPelota;
  119. begin
  120. Pelota:= TPelota(GetWindowLong(Wnd, GWL_USERDATA));
  121. if Pelota <> nil then
  122. Result:= Pelota.WinProc(Wnd, uMsg, wParam, lParam)
  123. else
  124. Result:= DefWindowProc(Wnd, uMsg, wParam, lParam);
  125. end;
  126.  
  127. procedure sTimerProc(Wnd: HWND; uMsg: UINT; idEvent: UINT_PTR; dwTime: DWORD); stdcall;
  128. var
  129. Pelota: TPelota;
  130. begin
  131. Pelota:= TPelota(idEvent);
  132. if Pelota <> nil then
  133. Pelota.TimerProc(Wnd, uMsg, idEvent, dwTime);
  134. end;
  135. //---------------------------------------------------------------------------
  136.  
  137. const Interval = 20;
  138.  
  139. constructor TPelota.Create(hParent: HWND; Visible: BOOL = true; AutoTimer: BOOL = false; FileName: PWCHAR = nil);
  140. var
  141. GdiPlusStartupInput: array[0..1] of int64;
  142. bm: TBITMAP;
  143. WinClass: TWNDCLASS;
  144. Rgn: HRGN;
  145. begin
  146. // Inicializamos GDI+.
  147. GdiPlusStartupInput[0]:= 1; GdiPlusStartupInput[1]:= 0;
  148. GdiplusStartup(gdiplusToken, @GdiPlusStartupInput, nil);
  149.  
  150. CanDestroy:= true; // Si false, no se destruye con WM_DESTROY
  151. OnWall:= nil; // Evento: Cuando la pelota alcanza la pared
  152. OnMissing:= nil; // Evento: Cuando la pelota sale fuera de su parent
  153. OnStop:= nil; // Evento: Cuando la pelota se para
  154. Left:= 0; // Posición de la Pelota en pantalla
  155. Top:= 0;
  156. FR:= 0; // Factor de rotación
  157. Ao:= 0; // Angulo inicial de rotación de la pelota
  158. X:= Left; // Posición de la Pelota alta precisión
  159. Y:= Top;
  160. CF:= 0.98; // Coeficiente de frenada en rebote
  161. Vox:= 1000; // Velocidad inicial X
  162. Voy:= 0; // Velocidad inicial Y
  163.  
  164. // Cargar Bitmaps
  165. Bitmap:= CreateBitmap(FileName);
  166. BitmapBak:= CreateBitmap(FileName);
  167.  
  168. // Obtengo DCs de Bitmaps y su tamaño
  169. BitmapDC:= CreateCompatibleDC(0);
  170. DeleteObject(SelectObject(BitmapDC, Bitmap));
  171. GetObject(Bitmap, sizeof(bm), @bm);
  172. BitmapDCBak:= CreateCompatibleDC(0);
  173. DeleteObject(SelectObject(BitmapDCBak, BitmapBak));
  174. Width:= bm.bmWidth;
  175. Height:= bm.bmHeight;
  176.  
  177. //Creamos la ventana
  178. ZeroMemory(@WinClass, sizeof(WinClass));
  179. WinClass.lpfnWndProc:= @sWinProc;
  180. WinClass.lpszClassName:= 'PelotaClass';
  181. RegisterClass(WinClass);
  182. Handle:= CreateWindowEx(WS_EX_TOOLWINDOW, WinClass.lpszClassName, 'Ball', WS_CHILD,
  183. 0, 0, Width, Height, hParent, 0, 0, nil);
  184. // Guardo el puntero this para acceder a esta clase desde funcion miembro static sWinProc
  185. SetWindowLong(Handle, GWL_USERDATA, LongInt(self));
  186.  
  187. // Hago una región redonda
  188. Rgn:= CreateRoundRectRgn(1, 1, Width+1, Height+1, Width, Height);
  189. SetWindowRgn(Handle, Rgn, true);
  190. DeleteObject(Rgn);
  191.  
  192. SetWindowPos(Handle, HWND_TOPMOST, 0,0,0,0, SWP_SHOWWINDOW or SWP_NOSIZE or SWP_NOMOVE);
  193. CR:= 90.0/Width; // Cte de rotación : 360/(PI*Image->Width);
  194.  
  195. SetAutoTimer(AutoTimer);
  196. SetVisible(Visible);
  197. end;
  198.  
  199. destructor TPelota.Destroy;
  200. begin
  201. DeleteObject(Bitmap);
  202. DeleteDC(BitmapDC);
  203. DeleteObject(BitmapBak);
  204. DeleteDC(BitmapDCBak);
  205.  
  206. // Shutdown GDI+
  207. GdiplusShutdown(gdiplusToken);
  208. end;
  209.  
  210. function Sign(d: double): integer;
  211. var
  212. R: PDWORD;
  213. begin
  214. Result:= 1; // asumo que es positivo
  215. R:= PDWORD(@d);
  216. inc(R);
  217. if ((R^ shr 31) and 1) = 1 then Result:= -1; // Es negativo
  218. if d = 0 then Result:= 0;
  219. end;
  220.  
  221. // Moviendo la pelota en un tiempo t
  222. procedure TPelota.Move(t: double);
  223. var
  224. Rgn: HRGN;
  225. DC: HDC;
  226. ParentRect: TRect;
  227. Vy, Xi, A: double;
  228. begin
  229. if GetParent(Handle) = 0 then exit;
  230.  
  231. GetClientRect(GetParent(Handle), ParentRect);
  232.  
  233. Rebote:= true;
  234. Vy:= 9.8*t; // Incremento de velocidad vertical;
  235. Xi:= Vox*t; // Incremento de X horizontal
  236.  
  237. // Posición de la pelota en un incremento de tiempo
  238. Y:= Y + 600*(Vy+Voy)*t; // El valor 600 es una escala
  239. X:= X + Xi; // Guardo la nueva posición
  240. Voy:= Voy + Vy; // Guardo la nueva velocidad de la pelota
  241.  
  242. // Angulo de rotación
  243. A:= Ao + Xi*CR*FR;
  244. Ao:= A;
  245.  
  246. // Rebote con el techo
  247. if Y < 0 then
  248. begin
  249. if @OnWall <> nil then OnWall(self, Techo, Rebote);
  250. if Rebote then
  251. begin
  252. Y:= 0;
  253. FR:= 0; // Factor de rotación en rebote
  254. Voy:= -Voy*CF; // reducción Y
  255. Vox:= Vox*CF; // reducción X
  256. end;
  257. end;
  258. // Salida por el techo
  259. if ((Y + Height) < 0) and (@OnWall <> nil) then
  260. OnMissing(self, Techo);
  261.  
  262. // Rebote en el suelo
  263. if (Y + Height) >= ParentRect.bottom then
  264. begin
  265. if @OnWall <> nil then OnWall(self, Suelo, Rebote);
  266. if Rebote then
  267. begin
  268. Y:= ParentRect.bottom - Height;
  269. FR:= 1/(1+Voy); // Factor de rotación en rebote
  270. Voy:= -Voy*CF; // reducción Y
  271. Vox:= Vox*CF; // reducción X
  272. end;
  273. end;
  274. // Salida por el suelo
  275. if (Y >= ParentRect.bottom) and (@OnMissing <> nil) then
  276. OnMissing(self, Suelo);
  277.  
  278. // Rebote con el pared izquierda
  279. if (X <= 0) then
  280. begin
  281. if @OnWall <> nil then OnWall(self, ParedIzquierda, Rebote);
  282. if Rebote then
  283. begin
  284. X:= 0;
  285. FR:= -FR*Sign(Voy)*Vox/1600;
  286. if CF<1 then Voy:= Voy-FR*Vox/1000;
  287. Voy:= Voy*CF; // reducción Y
  288. Vox:= -Vox*CF; // reducción X
  289. end;
  290. end;
  291. // Salida por la pared izquierda
  292. if ((X + Width) <= 0) and (@OnMissing <> nil) then
  293. OnMissing(self, ParedIzquierda);
  294.  
  295. // Rebote con el pared derecha
  296. if (X + Width) >= ParentRect.right then
  297. begin
  298. if @OnWall <> nil then OnWall(self, ParedDerecha, Rebote);
  299. if Rebote then
  300. begin
  301. X:= ParentRect.right - Width;
  302. FR:= FR*Sign(Voy)*Vox/1600;
  303. if CF<1 then Voy:= Voy+FR*Vox/1000;
  304. Voy:= Voy*CF; // reducción Y
  305. Vox:= -Vox*CF; // reducción X
  306. end;
  307. end;
  308. // Salida por la pared derecha
  309. if (X >= ParentRect.right) and (@OnMissing <> nil) then
  310. OnMissing(self, ParedDerecha);
  311.  
  312. // Cuando se para en el suelo
  313. if (Left = trunc(X)) and (Top = ParentRect.bottom - Height) and (@OnStop <> nil) then
  314. OnStop(self);
  315.  
  316. // Posiciono la pelota
  317. Left:= trunc(X);
  318. Top:= trunc(Y);
  319. MoveWindow(Handle, Left, Top, Width, Height, true);
  320.  
  321. // Rotación de la pelota
  322. BitBlt(BitmapDC, 0, 0, Width, Height, BitmapDCBak, 0, 0, SRCCOPY);
  323. RotateDC(BitmapDC, Width/2, Height/2, A);
  324. // ... y la pinto...
  325. DC:= GetDC(Handle);
  326. BitBlt(DC, 0, 0, Width, Height, BitmapDC, 0, 0, SRCCOPY);
  327. ReleaseDC(Handle, DC);
  328. end;
  329.  
  330. procedure TPelota.SetVisible(V: BOOL);
  331. begin
  332. if V then
  333. begin
  334. SetWindowLong(Handle, GWL_STYLE, GetWindowLong(Handle, GWL_STYLE) or WS_VISIBLE);
  335. SetWindowPos(Handle, HWND_TOPMOST, 0, 0, 0, 0, SWP_SHOWWINDOW or SWP_NOSIZE or SWP_NOMOVE);
  336. end
  337. else
  338. SetWindowLong(Handle, GWL_STYLE, GetWindowLong(Handle, GWL_STYLE) and not WS_VISIBLE);
  339. end;
  340.  
  341. // Timer interno
  342. procedure TPelota.SetAutoTimer(V: BOOL);
  343. begin
  344. AutoTimer:= V;
  345. if AutoTimer then
  346. SetTimer(Handle, UINT_PTR(self), Interval, @sTimerProc)
  347. else KillTimer(Handle, UINT_PTR(self));
  348. end;
  349.  
  350. procedure TPelota.TimerProc(Wnd: HWND; uMsg: UINT; idEvent: UINT_PTR; dwTime: DWORD); stdcall;
  351. begin
  352. Move(Interval/1000.0);
  353. end;
  354.  
  355. function TPelota.WinProc(Wnd: HWND; uMsg: UINT; wParam: WPARAM; lParam: LPARAM): DWORD; stdcall;
  356. var
  357. ps: PAINTSTRUCT;
  358. DC: HDC;
  359. begin
  360. Result:= 0;
  361. case uMsg of
  362. WM_PAINT:
  363. begin
  364. DC:= BeginPaint(Wnd, ps);
  365. BitBlt(DC, 0, 0, Width, Height, BitmapDC, 0, 0, SRCCOPY);
  366. EndPaint(Wnd, ps);
  367. end;
  368. WM_DESTROY:
  369. if CanDestroy then
  370. PostQuitMessage(0); //Destruimos la ventana
  371. else
  372. // Función por defecto de tratamiento de mensajes.
  373. Result:= DefWindowProc(Wnd, uMsg, wParam, lParam);
  374. end;
  375. end;
  376. //---------------------------------------------------------------------------
  377.  
  378. function TPelota.CreateBitmap(FileName: PWCHAR): HBITMAP;
  379. var
  380. DC: HDC;
  381. begin
  382. if FileName = nil then
  383. Result:= LoadBitmap(GetModuleHandle(nil), 'ID_PELOTA')
  384. else
  385. Result:= CreateHBITMAPFromFile(FileName);
  386. if Result = 0 then
  387. begin
  388. // Si no hay Bitmap creo uno vacio
  389. DC:= GetDC(0);
  390. Result:= CreateCompatibleBitmap(DC, 51, 51);
  391. ReleaseDC(0, DC);
  392. end;
  393. end;
  394.  
  395. end.

Ahora os muestro una broma de pelotas :D :D :D


delphi
  1. program Pelotas;
  2.  
  3. uses
  4. Windows,
  5. Messages,
  6. Pelota in 'Pelota.pas';
  7.  
  8. type
  9. TBroma = class
  10. private
  11. Count: integer;
  12. public
  13. constructor Create;
  14. procedure PelotaStop(Pelota: TPelota);
  15. end;
  16.  
  17. constructor TBroma.Create;
  18. begin
  19. Count:= 0;
  20. with TPelota.Create(GetDesktopWindow(), true, true) do
  21. begin
  22. CanDestroy:= false;
  23. OnStop:= PelotaStop;
  24. CF:= 0.95;
  25. end;
  26. with TPelota.Create(GetDesktopWindow(), true, true, 'Pelota7.png') do
  27. begin
  28. CanDestroy:= false;
  29. CF:= 1;
  30. Vox:= 700; // Velocidad inicial X
  31. end;
  32. end;
  33.  
  34. procedure TBroma.PelotaStop(Pelota: TPelota);
  35. begin
  36. with Pelota do
  37. begin
  38. X:= 0;
  39. Y:= 0;
  40. Vox:= 900 + random(300); // Velocidad inicial X
  41. Voy:= 0;
  42. if Count > 3 then
  43. Voy:= 10;
  44. CF:= 0.95;
  45. end;
  46.  
  47. if Count > 5 then exit;
  48. inc(Count);
  49.  
  50. with TPelota.Create(GetDesktopWindow(), true, true) do
  51. begin
  52. CanDestroy:= false;
  53. CF:= 1;
  54. Vox:= Pelota.Vox; // Velocidad inicial X
  55. end;
  56. end;
  57.  
  58.  
  59. var
  60. Msg: TMsg;
  61. Broma: TBroma;
  62. begin
  63. TBroma.Create();
  64.  
  65. // El bucle de mensajes
  66. while(GetMessage(Msg, 0, 0, 0)) do
  67. begin
  68. TranslateMessage(Msg);
  69. DispatchMessage(Msg);
  70. end;
  71. end.

Subo el código y ejecutable.


Saludos.

Archivos adjuntos


  • 4


IP.Board spam blocked by CleanTalk.